
How to Fix a Cracked Windshield: A DIY Guide
Wondering how do you fix a cracked windshield? Get clear, step-by-step DIY tips to repair chips and cracks and keep your auto glass safe and strong.
Nothing ruins your day quite like the sharp sound of a rock hitting your glass. Your first thought is likely about the cost. While a DIY repair kit seems like the cheapest option, it isn't always the most cost-effective in the long run. A failed repair can lead to a much more expensive full replacement, and you might be surprised to learn that your insurance could cover a professional fix for free. Before you spend any money, you need a clear strategy. We’ll break down the real costs, explore insurance benefits, and help you figure out how do you fix a cracked windshield without breaking the bank.
Key Takeaways
- Know when a DIY kit is an option: These kits are designed for simple, small chips (smaller than a quarter) that are not in your direct line of sight or close to the windshield's edge.
- A successful DIY fix requires careful prep: For a repair to hold, you must use a quality kit, thoroughly clean the damaged area of all debris, and work in dry, mild weather so the resin can cure correctly.
- Professionals offer a permanent, often-covered solution: Before starting, check if your insurance covers professional repairs. An expert provides a safer, more durable fix with superior materials, giving you a permanent solution and peace of mind.
What Kind of Windshield Damage Do You Have?
Before you can decide on a fix, you need to play detective and figure out exactly what kind of damage you’re dealing with. A tiny chip from a stray pebble is a completely different beast than a crack that’s starting to spread across your line of sight. Identifying the type of break is the first and most important step in determining whether a DIY kit will do the trick or if it’s time to call in a professional. Each type of damage has its own personality and requires a specific approach. Getting it wrong could mean a failed repair or, worse, the damage spreading until you need a full replacement. Let's walk through the most common types of windshield damage you might find on your vehicle.
Star Breaks
A star break looks just like its name suggests: a central point of impact with little cracks, or "legs," radiating outward like a starburst. This type of damage often happens when a small, sharp object like a piece of gravel hits your windshield. The good news is that star breaks are often repairable, especially if you catch them early and they are smaller than a quarter. The main goal of a repair is to get the resin into all those little legs to stop them from spreading further. If left untreated, changes in temperature or even road vibrations can cause those legs to grow quickly.
Bullseye Chips
A bullseye chip is one of the most common and straightforward types of windshield damage. It’s a circular break that looks like a small, dark circle with an outer ring, much like a target or a bullseye. This type of damage is typically caused by a rounder object, like a small rock, hitting the glass. Because the break is mostly self-contained, bullseye chips are usually the easiest to repair. A quality repair kit can inject resin that fills the separated area, leaving a clear and stable finish that prevents the chip from getting worse and restores the structural integrity of the glass.
Fissure Cracks
Fissure cracks, also called linear cracks, are single lines of damage that can run across your windshield. They can be short or long, and they often start near the edge of the glass where stress is highest. A very short fissure crack (less than a couple of inches) might be a candidate for a DIY fix, but these are particularly tricky. They have a bad habit of spreading due to vibrations from the road or temperature fluctuations. Any crack longer than a dollar bill is generally beyond the scope of a DIY kit and will likely require a professional auto glass service.
Combination Breaks
A combination break is a mix of two or more types of damage in one spot. For example, you might have a bullseye chip with small cracks radiating from it, creating a sort of star-bullseye hybrid. Because these breaks are more complex, they can be challenging to repair properly with a standard DIY kit. The resin needs to fill multiple types of gaps and cracks, which can be difficult to do evenly. For this kind of damage, it’s often best to get a professional opinion to see if a repair is even possible or if a full replacement is the safer choice.
What Tools Do You Need for a DIY Repair?
If you’re planning to tackle a windshield chip on your own, your success will largely depend on having the right tools. The main item you’ll need is a dedicated windshield repair kit, but a few other household supplies are essential for a clean and effective fix. Gathering everything before you start makes the process much smoother and helps you avoid common mistakes. Think of it like following a recipe; you wouldn’t start baking without making sure you have all the ingredients first. Let’s break down exactly what you’ll need to get the job done.
What's in a Windshield Repair Kit?
You can find DIY windshield repair kits at most auto parts stores and online. While they promise a quick fix, their contents and quality can vary quite a bit. A good kit should include a few key items: a special repair resin, an applicator or syringe to inject the resin, and an adhesive seal to isolate the damaged area. Some kits also come with a curing strip to place over the resin as it hardens. Be aware that the glue in some DIY kits can bubble during application, which can compromise the repair and make the damage more noticeable.
Other Cleaning and Safety Supplies
One of the biggest mistakes people make is not cleaning the damaged area properly before starting. Any dirt, debris, or moisture trapped in the chip will prevent the resin from bonding correctly, leading to a weak repair that can fail later on. Before you even open your kit, you’ll need a few extra supplies. Grab some rubbing alcohol and a clean microfiber cloth to thoroughly clean the glass. A small pin or tack can help you gently pick out any loose glass fragments from the impact point. It’s also a good idea to have safety glasses to protect your eyes.
How to Choose the Right Repair Kit
With so many options available, it can be tempting to just grab the cheapest kit on the shelf. However, this is one area where quality really matters. A low-quality resin might not hold up over time or could cure with a yellow tint, making the damage more obvious. Look for kits with positive reviews that specify the types of damage they work best on, like bullseyes or small star breaks. If you’re dealing with a larger crack or more complex damage, a DIY kit might not be enough. These situations often require professional auto glass services to ensure a safe and permanent solution.
Can You Repair Your Cracked Windshield Yourself?
When you spot a new chip or crack on your windshield, your first thought might be to grab a DIY kit from the auto parts store. It seems like a quick and cheap fix, and for very minor damage, it can be. However, deciding whether to tackle the job yourself isn't just about saving a few dollars; it's about ensuring your safety and the structural integrity of your vehicle. A poorly done repair can fail, causing the crack to spread and turning a small problem into one that requires a full, expensive replacement.
Before you break out the resin, you need to play detective and carefully examine the damage. The success of a DIY repair depends entirely on three key factors: the size and location of the damage, its overall severity, and whether it obstructs your view of the road. Understanding these elements will help you decide if this is a project you can handle or if it’s time to call in a professional for auto glass services. Let’s walk through what to look for.
Checking the Size and Location of the Damage
First, let's talk about size. A good rule of thumb is that if a chip is smaller than a quarter or a crack is shorter than a dollar bill, a DIY kit might work. Anything larger, and the resin in a standard kit likely won't be able to fill the space completely and create a strong bond. The location of the damage is just as important. If the crack or chip is very close to the edge of the windshield, it can weaken the entire structure. The windshield is a key safety component of your car, and damage along the perimeter can compromise its ability to protect you in an accident. Don't try to fix cracks that are near the edge.
Assessing the Severity of the Crack
Next, look closely at the crack itself. Is it a simple, clean chip, or does it have legs spreading out from the center? A single small chip can often be repaired, but complex breaks with multiple cracks are much harder to fix correctly with a DIY kit. The resin needs to penetrate every tiny fissure to be effective. A poorly repaired chip can trap air and moisture, which will cause it to spread into a full-blown crack later on. This turns what could have been a simple, professional repair into a costly windshield replacement. If the damage goes through more than the top layer of glass, it's definitely a job for an expert.
Is the Damage in Your Line of Sight?
This is the most critical question for your safety. Your direct line of sight is the area of the windshield right in front of you as you drive, roughly the width of your steering wheel. Even the best DIY repair can leave behind a slight distortion or haze in the glass. While it might seem minor, this small imperfection can catch the light or blur your vision at the worst possible moment, creating a dangerous distraction on the road. For this reason, any damage within the driver's line of sight should be evaluated by a professional. It’s always better to be safe, so if you're unsure, contact us for a free quote and an expert opinion.
How to Repair Your Windshield: A Step-by-Step Guide
If you’ve decided to tackle a small chip yourself, you’ve come to the right place. Using a DIY windshield repair kit can be a good temporary fix for minor damage, helping to prevent a small problem from spreading. Think of it as first aid for your auto glass. Before you begin, remember that every kit is slightly different, so always read the manufacturer’s instructions carefully. This guide will walk you through the general process so you know what to expect.
Keep in mind that a DIY repair often serves as a temporary patch rather than a permanent solution. The materials and tools in a home kit can't match the professional-grade resin and vacuum-injection equipment used by technicians. A professional windshield repair forces resin deep into the glass, creating a much stronger and more durable bond that’s nearly invisible. If you want a permanent fix that restores the structural integrity of your windshield, calling an expert is always your best bet. But if you're ready to give it a try, let's get started.
Step 1: Prep and Clean the Damaged Area
First things first, park your car in a shaded spot. You don’t want the sun curing the resin before it has a chance to fill the crack completely. Make sure the windshield is cool to the touch. Next, you’ll need to clear out any tiny, loose shards of glass from the chip or crack. A push pin or the corner of a razor blade works well for this. Be gentle, as you only want to remove debris. Once the area is clear, clean it thoroughly with an alcohol pad or glass cleaner to remove any dirt, oil, or moisture. A clean, dry surface is essential for the resin to bond properly with the glass.
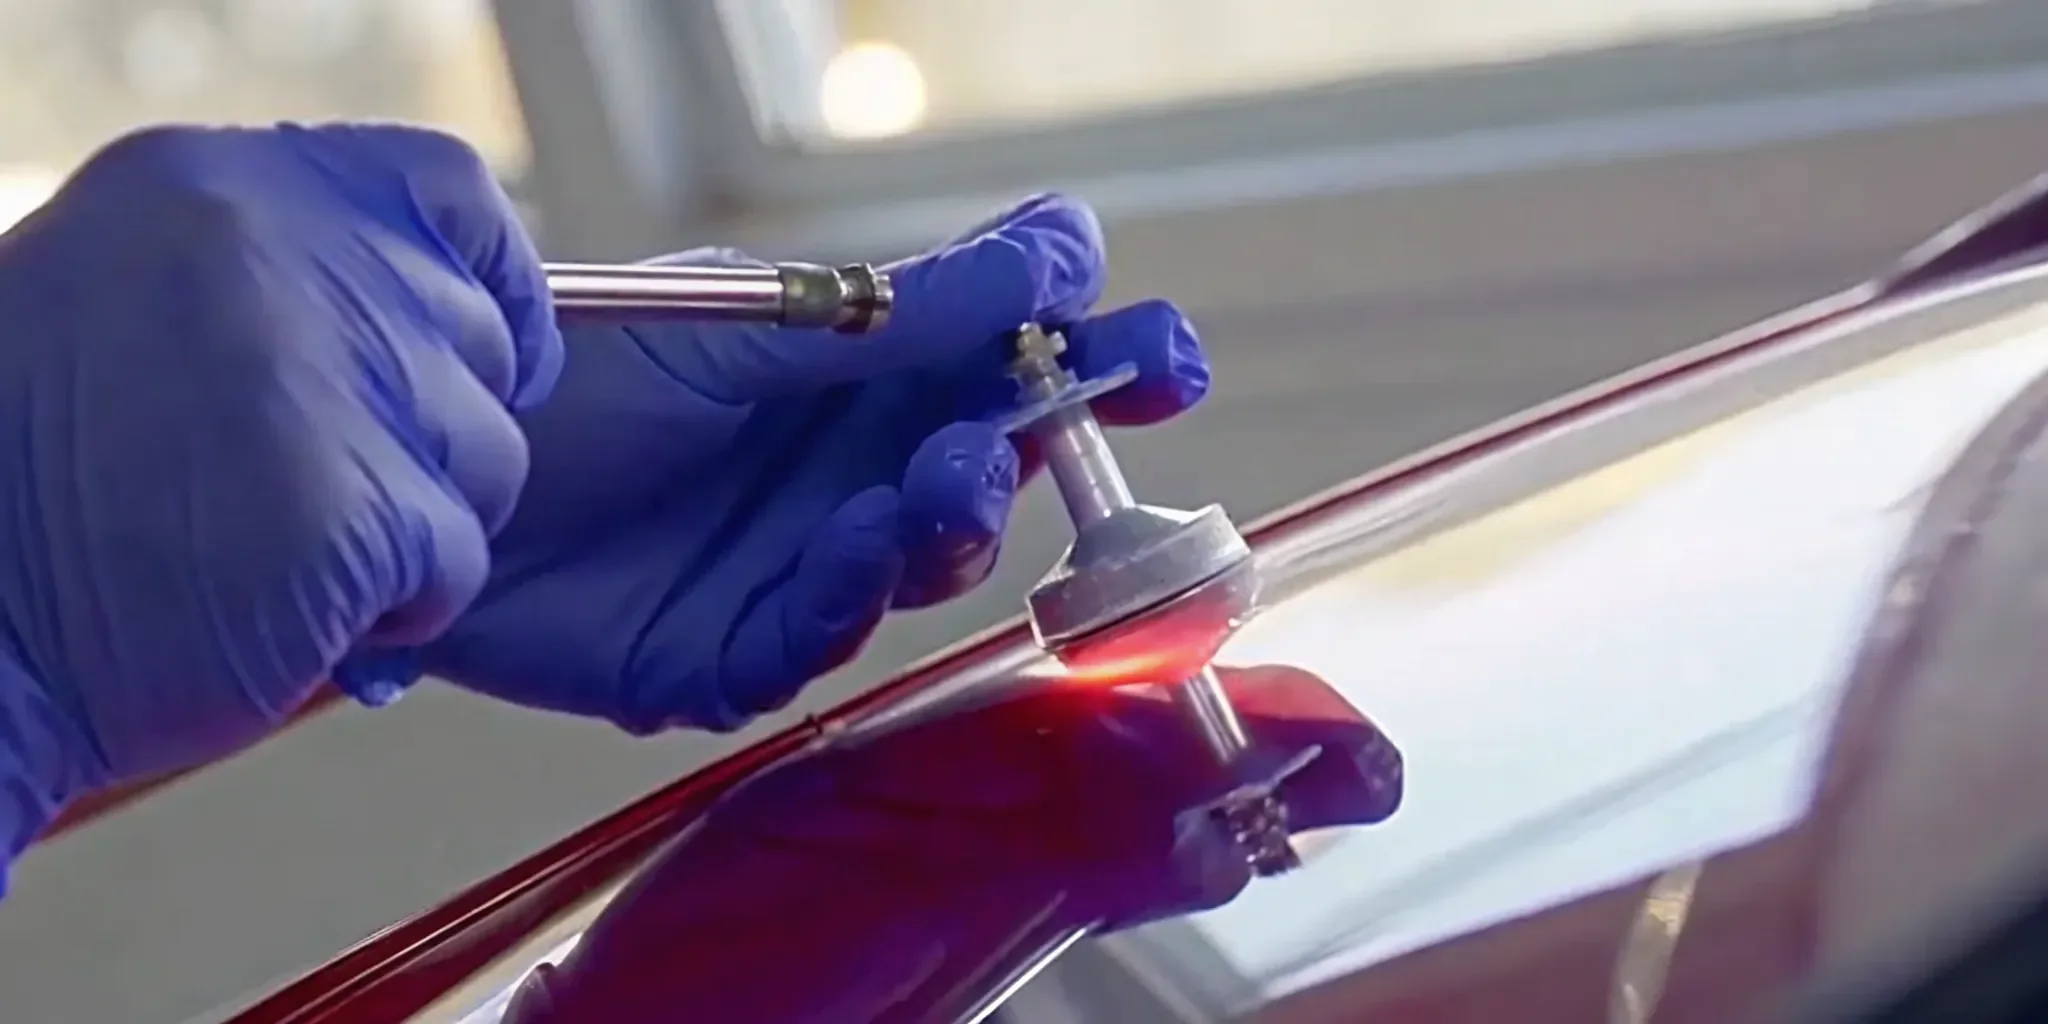
Step 2: Apply the Adhesive Seal and Pedestal
Now it’s time to set up the application tool. Your kit will come with an adhesive seal and a plastic pedestal. The seal is a double-sided sticky patch that you’ll place directly over the damage. The key here is precision. You need to center the hole in the seal perfectly over the chip’s impact point. Press down firmly to ensure it’s stuck tight with no gaps. This creates a watertight barrier. Next, attach the plastic pedestal to the top of the adhesive seal. This little piece acts as a funnel, guiding the repair resin exactly where it needs to go.
Step 3: Inject the Repair Resin
With your pedestal in place, you can now prepare the resin. Most kits use a syringe to inject the resin into the pedestal. Follow your kit’s instructions for how much resin to use. Once it’s in, you’ll create a vacuum to remove any air trapped inside the crack. This is a critical step because air bubbles will weaken the repair and leave it visible. Typically, you’ll pull the syringe plunger up and lock it in place for about 10 minutes. After the air is removed, you’ll push the plunger down to force the resin deep into the glass, leaving it for another 20 minutes to fully penetrate the damage.
Step 4: Cure the Resin Correctly
Once the resin has had time to work its way into every nook and cranny of the crack, it’s time to harden it. This process is called curing, and it relies on ultraviolet (UV) light. Remove the pedestal and seal, and immediately place the provided curing strip over the wet resin. This thin, clear film holds the resin in place and creates a smooth finish. Now, move your car out of the shade and into direct sunlight. The sun’s UV rays will harden the resin, creating a strong bond. This usually takes anywhere from 30 to 60 minutes, but check your kit’s instructions for the recommended time.
Step 5: Clean Up and Remove Excess Resin
After the resin has fully cured in the sun, you can perform the final step. Peel off the curing strip. You’ll notice a small amount of hardened, excess resin on the surface of the windshield. Your kit should include a small razor blade for this exact purpose. Hold the blade at a 45-degree angle to the glass and carefully scrape away the excess resin until the surface is completely smooth. Wipe the area with a clean cloth, and you’re done! If the chip is still very noticeable or you’re not satisfied with the result, it’s best to contact a professional to have it properly repaired.
How to Ensure the Resin Cures for a Lasting Repair
You’ve cleaned the chip and carefully injected the resin. Now comes the most important step: curing. This is the process where the liquid resin hardens and bonds with the glass, creating a strong and permanent fix. If the resin doesn’t cure properly, your repair won’t hold, and that small chip could still spread into a large crack down the road.
Getting this part right is what separates a successful DIY job from one you’ll have to do over again. It all comes down to creating the right environment for the resin to harden correctly. Think of it like baking; you need the right temperature and timing for everything to set perfectly. Let’s walk through exactly how to manage the conditions to get a durable, lasting repair that keeps your windshield strong and your view clear.
Finding the Right Weather Conditions
Weather plays a huge role in how well your windshield repair turns out. For the best results, you’ll want to work on a warm, dry day with low humidity. Rain or even damp air can introduce moisture into the resin, which prevents it from bonding correctly with the glass. This can lead to a weak repair that looks cloudy and fails over time. If you can, plan your repair for a clear day and work in a sheltered spot like a garage or carport to protect the area from any unexpected changes in weather.
Using Sunlight to Cure the Resin
The resin in your repair kit is specially formulated to harden, or cure, when it’s exposed to ultraviolet (UV) light. The easiest and most accessible source of UV light is, of course, the sun. Once you’ve applied the curing strip over the resin-filled chip, all you have to do is move your car into direct sunlight. On a sunny day, the resin should fully harden in about 30 to 60 minutes. You’ll know it’s done when the resin is hard to the touch. This natural method is effective and doesn’t require any special equipment, making it the go-to for most DIY repairs.
Curing Alternatives to Sunlight
What if it’s a cloudy day or you’re working inside a garage? Don’t worry, you don’t have to wait for the sun to appear. A great alternative is a small, handheld UV flashlight. Many professional technicians use these to speed up the process and ensure a consistent cure regardless of the weather. A dedicated UV light can harden the resin in as little as 30 seconds, which is a huge time-saver and helps guarantee a solid bond. You can typically find these online or at most auto parts stores, and they’re a handy tool to have for a quick and reliable repair.
Getting the Temperature and Timing Right
Besides the weather, the temperature of the glass itself is important. Before you even start the repair, make sure your windshield is cool to the touch. If your car has been sitting in the hot sun, the glass will be too warm, and the resin might start curing before it has a chance to fully seep into all the tiny crevices of the crack. After you inject the resin, let it sit for about 20 minutes before you expose it to UV light. This waiting period gives the resin time to settle and fill the damage completely, ensuring a stronger bond for your windshield repair.
Common DIY Windshield Repair Mistakes to Avoid
Taking on a DIY windshield repair can feel incredibly satisfying, but a few common missteps can turn a small fix into a major headache. The goal is to create a strong, nearly invisible repair that stops the damage from spreading for good. Unfortunately, simple mistakes can compromise the integrity of the fix, leading to a failed repair or even the need for a full windshield replacement. Knowing what to watch out for is half the battle. By avoiding these common errors, you give yourself the best shot at a successful, long-lasting repair that keeps your windshield secure and your view clear.
Waiting Too Long to Fix the Damage
It’s easy to spot a small chip and think, "I'll get to that later." But when it comes to windshield damage, time is not on your side. Everyday driving creates vibrations, and temperature fluctuations cause the glass to expand and contract. These forces put stress on the weakened area, encouraging a small chip to spread into a long crack. Once a crack grows too long, a simple DIY repair is often no longer an option. The best course of action is to address any damage as soon as you notice it. A quick response can prevent a minor issue from becoming a costly windshield replacement.
Using a Low-Quality Repair Kit
When you’re standing in the auto parts aisle, it can be tempting to grab the cheapest repair kit on the shelf. However, this is one area where you truly get what you pay for. Low-quality kits often come with inferior resin that may not properly bond with the glass. This can result in a weak repair that fails over time, or a cloudy finish that obstructs your vision. A poor-quality resin might not fully seal the crack, allowing moisture and debris to get in and cause more damage later. Investing in a reputable, well-reviewed kit is essential for achieving a clear and durable repair that you can trust.
Not Cleaning the Area Properly
One of the most critical steps in windshield repair is also one of the easiest to overlook: cleaning the damaged area. Before you apply any resin, the chip or crack must be completely free of dirt, glass fragments, and moisture. Any debris left behind will prevent the resin from forming a perfect bond with the glass, creating weak spots in the repair and leaving it looking messy. Take your time to thoroughly clean and dry the area with rubbing alcohol and a microfiber cloth. A clean surface is the foundation of a successful and almost invisible repair, so don't rush this part of the process.
Ignoring the Weather During the Repair
The weather plays a surprisingly big role in how well your DIY repair turns out. The resin used in repair kits needs specific conditions to cure correctly. Attempting a repair in direct, intense sunlight can cause the resin to cure too quickly, before it has a chance to fully penetrate the crack. On the other hand, working in the rain or in very cold temperatures can prevent the resin from curing properly at all, resulting in a failed bond. For the best results, plan your repair for a mild, dry day and work in a shaded area like a garage or carport to give the resin the perfect environment to set.
When Should You Replace Your Windshield Instead of Repairing It?
DIY repair kits are fantastic for minor chips and dings, but they have their limits. Sometimes, the damage is just too significant, and a simple resin fix won't cut it. Knowing when to put down the DIY kit and call for a full windshield replacement is crucial for your safety. A compromised windshield can't do its job of protecting you in an accident, so it's important to recognize the signs that a repair isn't enough.
Signs the Damage Is Too Severe
A good rule of thumb is the dollar bill test. If a crack is longer than a dollar bill, or a chip is larger than a quarter, it’s generally too big for a DIY repair. Damage of this size often requires a full replacement to restore the windshield's structural integrity. You also need to consider how the damage is changing. If you wait too long, a small crack can easily spread due to road vibrations or temperature shifts, quickly becoming unrepairable. If the damage is deep enough to feel on the inside of the glass or if you have multiple cracks, the windshield is too weak for a simple patch job.
When a Crack Is in Your Line of Sight
Location is just as important as size. Any damage directly in the driver's line of sight is a major safety hazard. Even a perfect repair can leave a slight distortion, which can be incredibly distracting while you're driving. This is one area where you should never compromise. Cracks that start or spread to the edge of the windshield are also a red flag. These can weaken the entire structure, affecting how your airbags deploy and how the roof holds up in a rollover. For newer cars with advanced safety features, damage near cameras or sensors can disrupt their function, making a professional replacement and recalibration necessary.
How a Professional Makes the Call
When you're not sure, getting an expert opinion is the best move. A trained technician can assess the damage with a level of detail you might miss. They understand the specific types of breaks and know exactly what can be safely repaired. Reputable shops will always try to repair your windshield first because it saves you time and money. Our auto glass services prioritize repair over replacement whenever it's a safe and effective option. We can also help you work with your insurance provider, as many policies cover the full cost of a repair. Ultimately, a professional can give you a clear answer and ensure your vehicle is safe for the road. If you're looking at a crack and feeling uncertain, it's time to get a free quote from an expert.
DIY vs. Professional Windshield Repair
Deciding between a DIY kit and calling a professional can feel like a toss-up between saving time and money. While tackling a small chip yourself seems straightforward, it’s important to weigh the potential risks against the benefits. A quick fix might be tempting, but the quality of the repair directly impacts your safety and your wallet down the road.
The main difference comes down to the tools, materials, and expertise involved. A professional technician uses industry-grade resin and specialized equipment to create a vacuum, removing all air and moisture from the damage before injecting the filler. This process ensures a strong, durable bond that restores the structural integrity of your windshield. A DIY kit, on the other hand, is a one-size-fits-all solution that often can’t achieve the same result. Let’s break down what that means for you.
Differences in Quality and Durability
When it comes to windshield repair, quality is everything. A poorly repaired chip can easily spread, turning a minor issue into a major crack that requires a full windshield replacement. DIY kits often result in a less durable fix because they can’t clear the damaged area of tiny air pockets. This leads to a weaker bond that can fail under stress from temperature changes or normal driving vibrations. A professional repair, however, is designed to last. Technicians have the training to assess the damage correctly and use advanced tools to ensure the resin completely fills the break. The result is a nearly invisible repair that permanently stops the damage from spreading and reinforces the glass. Our auto glass services come with a lifetime workmanship warranty, giving you peace of mind that the job is done right the first time.
Comparing Costs and Insurance Coverage
At first glance, a $20 DIY kit seems much cheaper than a professional service. But the final cost isn't always that simple. Many people don't realize that their auto insurance policy might cover the full cost of a professional chip repair without any out-of-pocket expense. If you have comprehensive coverage, your insurer often prefers to pay for a small repair now to avoid paying for a costly replacement later. Before you buy a kit, it’s worth making a quick call to your insurance agent to check your coverage. If a DIY attempt fails and the crack spreads, you’ll likely be on the hook for your full deductible for a replacement. We can help you work with your insurance provider and offer a free quote so you know exactly what to expect.
When to Call the Experts at Avision Auto Glass
It’s time to call a professional if the damage is larger than a quarter, has multiple cracks extending from a central point, or obstructs your direct line of sight. These types of damage are more complex and require professional-grade equipment to fix safely. Waiting too long is another risk; dirt and moisture can settle into the chip, making a successful repair much more difficult. As a family-owned business, we understand the importance of trust and reliability. Our licensed and insured technicians have the experience to handle any repair, ensuring your windshield is safe and secure. When you choose a professional, you’re not just paying for a service; you’re investing in the safety of your vehicle and the clarity of your view. You can learn more about Avision Auto Glass and our commitment to quality work.
How to Prevent Future Windshield Damage
While you can’t always avoid a stray rock on the highway, you can take some simple steps to protect your windshield from unnecessary damage. A little prevention goes a long way in saving you time and money on future repairs. It really comes down to being mindful on the road and keeping up with some basic vehicle maintenance. By building a few good habits, you can keep your auto glass in great shape for years to come.
Driving Habits to Protect Your Glass
The way you drive has a big impact on your windshield’s health. One of the easiest changes you can make is to increase your following distance, especially behind large trucks or construction vehicles that can kick up rocks and debris. Give yourself at least three to four seconds of space. It’s also smart to slow down on gravel roads or uneven pavement. Driving at a lower speed reduces the force of any flying debris that might hit your glass. Where you park matters, too. Try to avoid parking directly under trees with heavy branches or in active construction zones where your windshield is more exposed to falling objects.
Maintenance Tips for a Healthy Windshield
A little regular care can make a huge difference. Start by checking your wiper blades every six months. Worn-out blades can get gritty and scratch the glass, creating weak spots. When you clean your windshield, use a cleaner designed for auto glass, as ammonia-based products can damage your tint and seals over time. Most importantly, if you get a small chip, don't wait to address it. Road vibrations and temperature shifts can quickly turn a tiny chip into a long crack that requires a full replacement. Getting a chip repair right away is the best way to stop the damage from spreading.
Related Articles
- DIY Windshield Chip Repair: A Complete Guide
- Why a Small Windshield Chip Spreads & How to Stop It
- Back Windshield Replacement: What Will It Cost You?
Frequently Asked Questions
What happens if my DIY repair doesn't look good or fails later? This is a common concern, and unfortunately, there isn't a simple do-over. If a DIY repair fails or looks cloudy, it's because air or moisture got trapped, or the resin didn't fully bond with the glass. A professional technician might be able to assess it, but often the low-quality resin from a home kit makes a second, professional repair impossible. In many cases, a failed DIY attempt means the only remaining option is a full windshield replacement.
Is it really that important to fix a tiny chip right away? Yes, absolutely. A small chip is a weak point in your windshield. Every time you drive, your car's frame flexes, putting stress on the glass. Temperature changes also cause the glass to expand and contract. These forces can easily turn that tiny, simple-to-fix chip into a long, unrepairable crack overnight. Plus, the longer you wait, the more dirt and moisture can get inside the chip, which makes any future repair less effective and more visible.
Will a repaired chip be completely invisible? The goal of a repair is to restore the structural strength of the windshield and stop the damage from spreading. While a high-quality professional repair can make a chip nearly disappear, reducing its visibility by 80 to 95 percent, you might still see a tiny blemish where the impact occurred. The final result depends on the type, size, and age of the damage. A DIY repair will almost always be more noticeable than a professional one.
How do I know if my insurance will cover a professional repair? Many auto insurance policies with comprehensive coverage will pay the full cost of a windshield repair without you having to pay a deductible. Insurers prefer this because a small repair is much cheaper for them than a full replacement down the road. The best way to know for sure is to look at your policy details or give your insurance agent a quick call. Reputable auto glass shops can also help you navigate the claims process.
Can I go through a car wash after repairing my windshield? It's best to wait a little while to let the repair fully set. For a DIY repair, you should wait at least 24 to 48 hours before exposing it to the high-pressure water and temperature changes of a car wash. For a professional repair, the resin and curing process are much more advanced. Your technician will give you specific instructions, but the bond is typically much stronger and cures faster, so you won't have to wait as long.