
Windshield Crack Stopper: When to DIY vs. Call a Pro
Find out when a windshield crack stopper is the right choice and when it’s safer to call a pro for repair. Learn tips for effective DIY fixes.
Think of a DIY windshield crack stopper as first aid for your auto glass. For a small, simple chip, it can be a fantastic tool to stabilize the damage and prevent it from spreading, much like putting a bandage on a small cut. But just as some injuries require a doctor, some windshield damage needs professional attention. Attempting to fix a long crack or a complex break with a basic kit can make the problem worse and compromise your safety. This guide will help you triage the damage so you can confidently decide when a DIY fix is enough and when it’s time to call for expert help.
Key Takeaways
Use DIY kits for small, immediate fixes: These kits are best for fresh, simple chips smaller than a quarter. They can stop the damage from spreading but are not a permanent replacement for a professional repair.
Certain damage requires a professional: For your safety, skip the DIY kit if a crack is longer than a dollar bill, is in your direct line of sight, or reaches the edge of the windshield. These issues can compromise the glass's structural integrity and need an expert.
Consider the long-term value of a pro: A professional repair costs more upfront but provides a permanent, warrantied solution. Before buying a kit, check your insurance policy, as many plans cover the full cost of professional repairs, giving you a lasting fix for no out-of-pocket expense.
What Is a Windshield Crack Stopper?
When you first spot a small chip or crack in your windshield, your first thought might be to panic. Your second might be to find a quick fix. That’s where a windshield crack stopper, or a DIY repair kit, comes in. Think of it as first aid for your auto glass. These kits are specifically designed to handle minor damage, like small chips (bullseyes), star-shaped breaks, or tiny cracks that are smaller than a quarter. You can usually find them at any auto parts store for less than $20, making them a tempting option for a quick patch.
The core of these kits is a special UV-activated resin. The idea is to fill the damaged area with this resin to prevent the crack from spreading and to make the blemish less noticeable. It’s a solution many people try for very small, fresh damage before it has a chance to get worse. While these kits can be a decent temporary measure, they aren't a permanent substitute for professional work. For damage that’s directly in your line of sight, larger than a quarter, or has already started to spread, a DIY kit simply won’t cut it. In those cases, a professional windshield repair is the safest and most effective option to ensure your glass is structurally sound and your vision is clear. A pro has the tools and materials to create a much stronger, more durable bond that a DIY kit can't replicate.
How Do They Work?
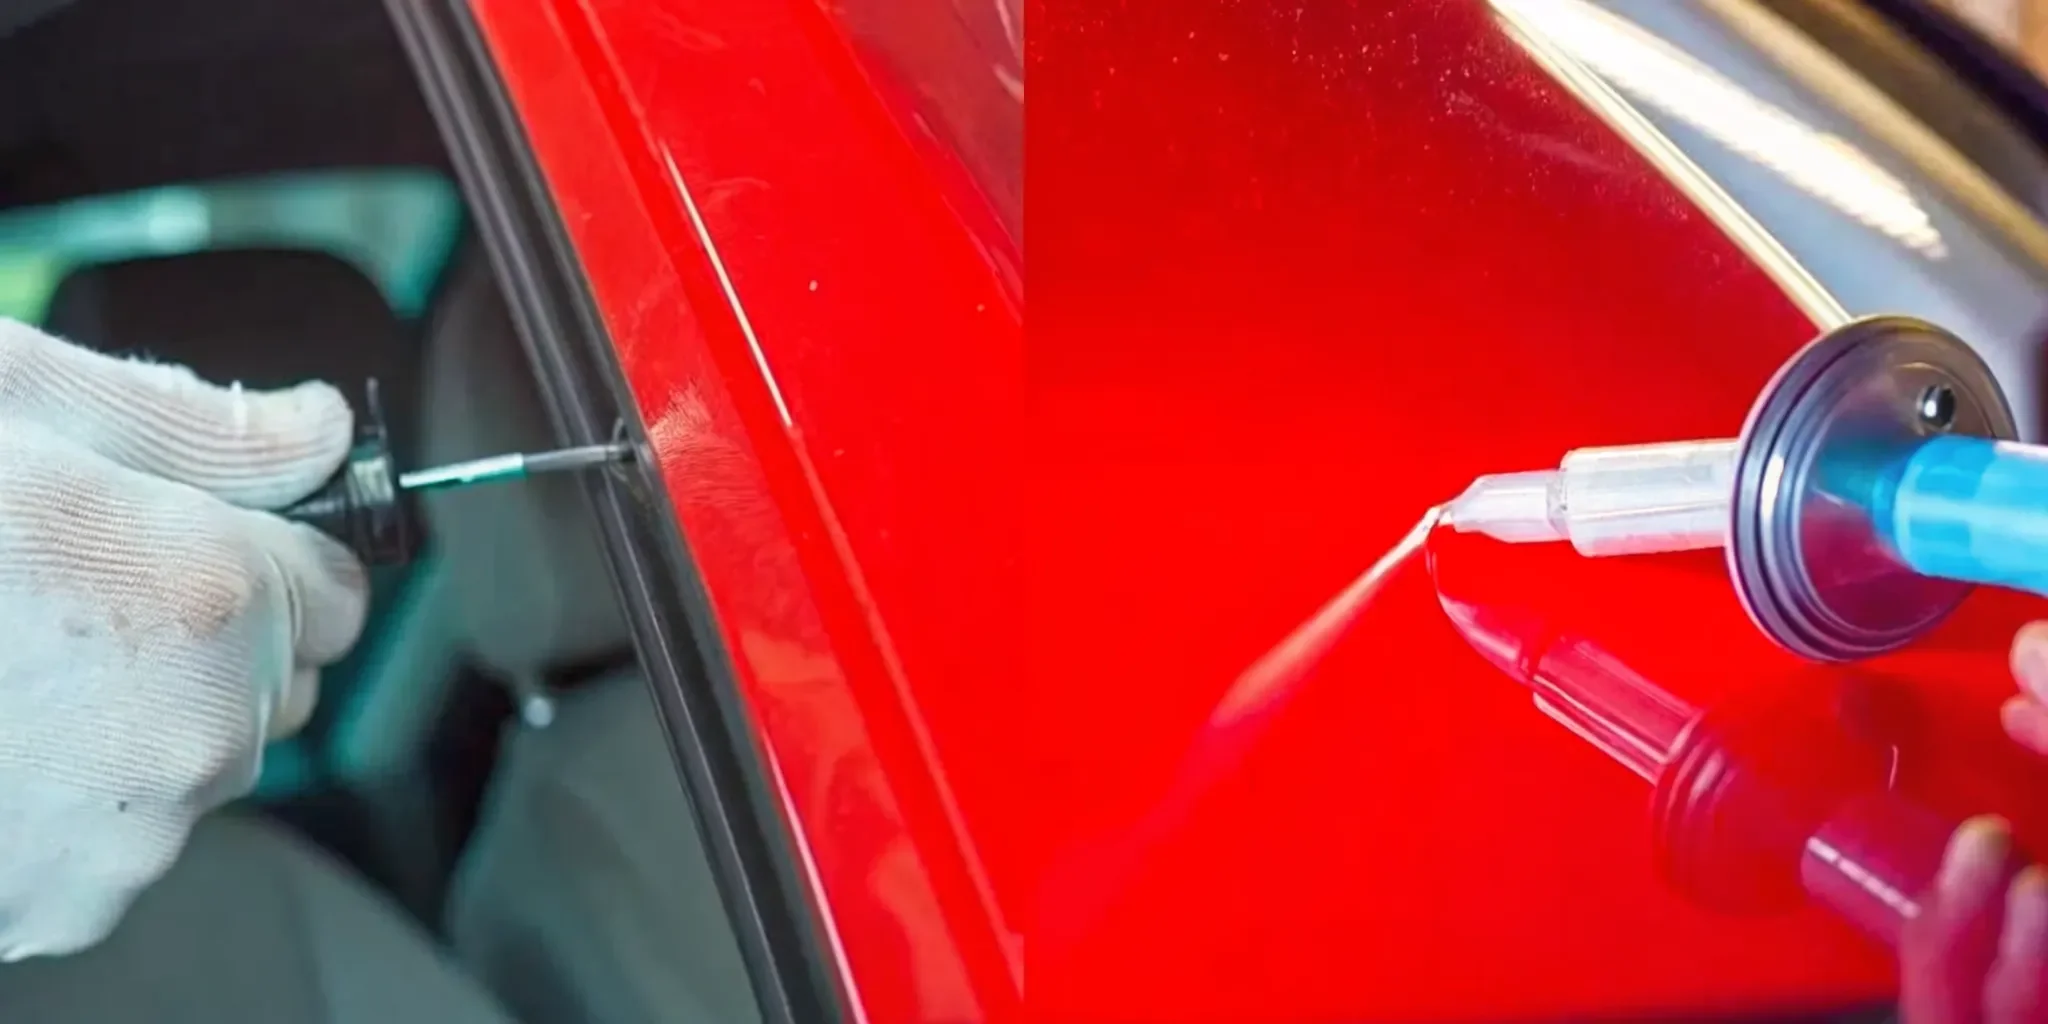
The magic behind a DIY windshield repair kit is pretty straightforward. The main goal is to clear air out of the chip or crack and fill that empty space with a durable resin. Most kits come with a tool, often a suction-cup-style injector, that you place directly over the damage. This device creates a vacuum to pull the air out before forcing the liquid resin deep into the break.
Once the resin has filled every nook and cranny of the crack, it needs to harden, or "cure." This process uses ultraviolet (UV) light. On a sunny day, you can just park your car outside and let the sun do the work, which usually takes about 30 to 60 minutes. The cured resin bonds the glass together, making the area strong again and helping to minimize the appearance of the original damage.
Common Types of DIY Repair Kits
When you start shopping for a DIY kit, you’ll notice they all share a few basic components. A standard windshield repair kit typically includes a tube of resin, an applicator or injector, and a curing strip. The applicator is the most important tool, as it helps you apply the resin precisely and without making a mess. Some of the most popular and effective brands you'll see on the shelves are Rain-X and 3M.
While most kits are similar, some offer extra tools to make the job easier. You might find kits with special suction cups for better stability, tools to clear away loose glass shards, or even a small UV light. This can be really handy if you need to do the repair on a cloudy day or inside a garage.
A Look at Top-Rated DIY Repair Kits
If you’ve decided to try a DIY fix for a small chip or crack, you’ll find plenty of options at your local auto parts store or online. The sheer number of choices can be a bit overwhelming, so I’ve broken down a few of the most popular and highly-rated kits. Each one has its own strengths, whether it’s ease of use, the type of damage it’s best for, or its price point. Taking a moment to understand what each kit offers will help you pick the right one for your specific situation and give you the best shot at a successful repair.
Rain-X Windshield Repair Kit
The Rain-X Windshield Repair Kit is a go-to for many DIYers because it’s widely available and simple to use. It’s designed to fill small chips and cracks quickly, minimizing their appearance and stopping them from spreading. The process is pretty straightforward, and many users have found it works well for a quick, cost-effective fix. Some people even recommend using a hair dryer to gently heat the glass, which can help the resin flow deeper into the crack. Just be aware that while it can make the damage much less noticeable, some users report that tiny holes might still be visible up close after the repair is complete.
3M Windshield Repair Kit
If you're looking for something that promises more professional-grade results, the 3M Windshield Repair Kit is a strong contender. This kit is known for its high-quality resin and is capable of repairing cracks up to 12 inches long, which is more than many other DIY options can handle. People who use it often praise the clear, detailed instructions that walk you through the process. The goal of this kit is not just to hide the damage but to restore the windshield's structural integrity. Many users have shared that their repairs have held up well over time, making this a reliable choice for those willing to be a bit more hands-on.
Permatex Windshield Repair Kit
The Permatex Windshield Repair Kit is another excellent option, especially if you value a user-friendly design. It comes with everything you need, and the application process is designed to be as simple as possible. This kit is great at restoring visibility and strength to the damaged area. Reviewers often point out how effectively the resin fills the crack and how quickly it cures in sunlight, which means you don't have to wait around for long. If you’re new to DIY repairs and want a kit that won’t feel complicated, this is a solid choice that delivers effective results without a steep learning curve.
Blue-Star Windshield Repair Kit
For those looking for an affordable and practical solution for very minor damage, the Blue-Star Windshield Repair Kit is worth considering. It’s a budget-friendly option that gets the job done on small chips and dings. Users find it to be a great value, providing a quick and easy fix that prevents further spreading. The kit’s special resin is made to bond directly with the glass, which helps bring back clarity and strength. While it might not have the same brand recognition as some others, it receives positive feedback for its simplicity and effectiveness, making it a smart pick for a quick, no-fuss repair on a tight budget.
How to Choose a DIY Repair Kit
Walking down the auto parts aisle, you’ll see a handful of different DIY windshield repair kits. They might look similar, but the results they deliver can vary wildly. Choosing the right one depends on more than just grabbing the first box you see. To give yourself the best shot at a successful repair, you need to look at the quality of the materials, the tools included, and whether the kit is even designed for the type of damage you have. Taking a few minutes to check these details can be the difference between a nearly invisible fix and a frustrating afternoon.
Check the Resin Quality
The star of any repair kit is the resin. This is the clear liquid that fills the chip or crack, hardens, and holds the glass together. When you're comparing kits, pay close attention to the quality of the resin. A good kit will use a durable resin that flows easily into the tiniest crevices of the crack. Once cured, high-quality resin strengthens the damaged area and makes the blemish much less noticeable. Skimping on resin quality can lead to a weak repair that doesn't last or a cloudy spot on your windshield that looks almost as bad as the original chip.
Look for Easy-to-Use Tools
A great resin is only effective if you can get it into the crack properly. That’s where the tools come in. The best DIY kits come with user-friendly tools designed to make the process as simple as possible. Look for kits that include a sturdy suction-cup-style applicator to create a vacuum over the damage, which helps pull the resin deep into the crack. A precision injector or syringe gives you better control when applying the resin. Clear, step-by-step instructions are also a must. A well-designed kit makes the job feel less intimidating and helps you get a professional-looking result.
Match the Kit to Your Crack Type
Not all windshield damage is the same, and neither are the repair kits. Some are specifically designed for small, round bullseye chips, while others are better suited for star-shaped breaks or short, single cracks. Before you buy, take a close look at the damage on your windshield. Read the packaging on any kit you consider to see what types of cracks it’s made to fix. Using a kit designed for a simple chip on a longer crack won’t give you the structural integrity you need, and the crack will likely continue to spread.
Consider Curing Time and Temperature
Most DIY resins are cured by ultraviolet (UV) light from the sun. This means you’ll get the best results working on a clear, sunny day. The instructions will specify the ideal temperature range for the repair, so be sure to check the forecast. If you have to work in a garage or on a cloudy day, the resin may not harden correctly. Some guides suggest you can gently warm the glass with a hairdryer if it’s too cold, but direct sunlight is always the best option for a strong, permanent bond.
Do DIY Crack Stoppers Really Work?
So, let's get straight to it: can a $20 kit from the auto parts store really fix your windshield? The honest answer is sometimes. For very small, simple chips, a DIY kit can be a decent temporary fix that stops the damage from getting worse and makes it less noticeable. Think of it as first aid for your windshield. The resin in these kits is designed to fill the air gap in the glass, which helps prevent a small chip from turning into a massive crack that requires a full replacement.
However, the success of a DIY repair depends heavily on a few things: the type and size of the damage, the quality of the kit you choose, and how carefully you follow the instructions. It’s a process that requires patience and a steady hand. If the resin isn’t applied correctly or doesn’t cure properly, you could end up with a cloudy spot on your windshield or, worse, a repair that fails and allows the crack to spread anyway. While they have their place, these kits are not a magic bullet for every type of windshield damage.
Success Rates for Different Cracks
DIY repair kits are most effective on small, contained damage. They generally work best on round chips (often called bullseyes) or small star-shaped breaks that are no bigger than a quarter. These simple chips are easier to fill completely with the resin provided in the kit. Some products claim they can handle single cracks up to a foot long, but the success rate for these is much lower. A long crack is under more tension, and it’s difficult for a DIY kit to inject resin evenly along its entire length, making a professional windshield repair a much safer bet.
How Long Do DIY Repairs Last?
When done correctly on a small chip, a DIY repair can last for a surprisingly long time. The main goal of the resin is to bond the glass and stop the crack from spreading, and for minor damage, it often does this very well. The repair can make the blemish almost invisible and hold up against temperature changes and road vibrations for months or even years. However, it’s best to view it as a semi-permanent solution. The resin used in DIY kits isn't as strong as what professionals use, and it may not create a bond that lasts the lifetime of your vehicle.
Understanding the Limits of DIY Kits
While tempting, DIY kits have clear limitations. The tools are basic, the resin isn't professional-grade, and without specialized vacuum equipment, it's nearly impossible to remove all the air from the crack. This can lead to a weak repair that fails over time. For anything more than a tiny chip, the safest and most effective way to stop a crack from spreading is to have it professionally repaired. A technician has the right tools and materials to ensure the damage is completely and permanently sealed, which is why we can offer a lifetime workmanship warranty on our work.
When to Call a Professional Instead
DIY repair kits can be fantastic for tiny chips and dings, but they have their limits. Knowing when to put down the kit and pick up the phone is key to keeping your car safe and avoiding a bigger headache down the road. Some types of windshield damage are simply too severe for a DIY fix. Attempting to repair them yourself can waste your money, make the damage worse, and, most importantly, compromise your safety. A professional technician has the training, industrial-grade materials, and experience to assess the damage properly and perform a repair that restores the structural integrity of your windshield. For certain cracks, a full replacement is the only safe option, and that’s a job best left to the experts.
The Crack Is Too Long
If you’re looking at a crack that’s longer than a dollar bill, it’s time to call a professional. Most DIY kits are only effective on cracks up to a few inches long. Once a crack extends beyond six inches, it seriously weakens the windshield's structure. Think of it like a tear in a piece of fabric; a small snag can be mended, but a long rip compromises the whole garment. A long crack can quickly spread due to temperature changes or road vibrations, turning a repairable problem into a mandatory replacement. A professional can determine if a windshield replacement is necessary to ensure your vehicle is safe to drive.
It's in Your Line of Sight
Any damage directly in your line of sight is a major safety concern. Even if a DIY kit successfully fills the crack, it can leave behind a slight distortion or haze. While that might not matter in a corner of the windshield, it’s a dangerous distraction right where you need the clearest possible view of the road. Professional repairs are held to strict standards for optical clarity. If the damage is in your critical viewing area, a technician will often recommend a full replacement because your safety is the top priority. Don’t take chances with your visibility; it’s just not worth the risk.
The Damage Reaches the Edge
A crack that starts at or runs to the edge of the windshield is more serious than it looks. The edges are the weakest points of the glass, and damage there can compromise the entire windshield's structural stability. Your windshield does more than just block wind; it supports the roof in a rollover and helps your airbags deploy correctly. A crack at the edge creates a weak point that can shatter under pressure. This type of damage requires a professional assessment to see if a repair is even possible. In most cases, a replacement is the only way to restore the windshield’s strength and keep you safe.
You Have Complex or Multiple Cracks
DIY kits are designed for simple, isolated damage like a small bullseye or a single, short crack. If your windshield has multiple chips, a star-shaped break with long legs, or a combination of different types of damage, a DIY kit won’t cut it. These complex breaks have too many stress points for a simple resin injection to handle effectively. Trying to fix them yourself often results in an incomplete repair that fails to stop the cracks from spreading. When the damage is extensive or complicated, it’s best to let a professional handle it. They have the tools to properly fix complex breaks or can tell you when it’s time to get a quote for a new windshield.
DIY Repair vs. Professional Service
Deciding between a DIY kit and calling a professional can feel like a tough choice. On one hand, you have a cheap, quick fix you can grab at the store. On the other, you have the expertise and reliability of a trained technician. While handling a small chip yourself might seem empowering, it’s important to weigh the immediate savings against the potential for future headaches. The right choice depends on the damage, your comfort level, and how much you value peace of mind. Let's break down the key differences to help you decide what’s best for your car and your wallet.
Comparing Cost and Long-Term Value
The biggest draw of a DIY kit is the price tag. For under $20, you can pick one up and feel like you’ve saved a bundle. However, that low cost often comes with a catch. These kits are designed to be a temporary fix, mostly to stop a small chip from spreading immediately. They don't always restore the structural integrity of the glass. An improper repair can fail, allowing the crack to grow and forcing you to get a full windshield replacement down the line. A professional auto glass service costs more upfront but provides a permanent, reliable solution that protects your windshield for the long haul.
Factoring in Your Time and Skill
Using a DIY kit correctly takes time and a bit of skill. For the best results, you need to apply the resin as soon as the damage happens, before any dirt or moisture gets inside the crack. This isn't always practical. Plus, there’s a learning curve. If you apply the resin incorrectly, you could trap air bubbles or make the damage more noticeable. Some emergency "fixes" like using superglue can actually prevent a professional from being able to do a proper repair later. Calling a mobile service means a technician comes to you, saving you the time and stress of doing it yourself.
What About Insurance and Warranties?
Before you buy a DIY kit, check your auto insurance policy. Many comprehensive plans cover the full cost of windshield repairs, meaning you might not have to pay anything out of pocket for a professional service. This often makes calling a pro the most cost-effective option. Furthermore, a reputable company provides a lifetime workmanship warranty, giving you confidence that the repair is done right. A DIY kit offers no such guarantee. If the repair fails a week later, you’re back at square one. Getting a free quote can help you understand your options before making a decision.
What Do Real Users Say About DIY Kits?
When you’re trying to decide if a DIY kit is right for you, hearing from people who have actually used them can be incredibly helpful. Scouring reviews and forums gives you a clear picture of what to expect, from the best-case scenarios to the common frustrations. Generally, users find that these kits can be a great quick fix, but they come with some significant limitations that are important to understand before you start.
What People Love
It’s no surprise that the biggest draw for DIY windshield repair kits is the price. For a fraction of the cost of a professional service, you can pick up a kit and handle a small chip in your own driveway. Many users are happy with the convenience and affordability. Products like the popular Rain-X® Windshield Repair Kit get praise for their ability to make small blemishes less noticeable and, crucially, stop them from spreading. When used correctly on a fresh, small chip, the resin fills the break and can make the glass strong again, giving you peace of mind and saving you a trip to the shop.
Common Complaints
On the flip side, a common theme in user reviews is that DIY results are often hit-or-miss. Many people express frustration when a kit fails to work as advertised, leaving them with the same crack they started with, plus a bit of a mess. Users often report that the resin can be difficult to apply neatly or that it doesn’t fully cure, especially in less-than-ideal weather. While a kit might reduce the appearance of a small chip, it often can’t completely erase deeper or older cracks, which can be a real letdown if you’re aiming for a flawless finish.
Setting Realistic Expectations
To get the best possible outcome from a DIY kit, timing is everything. Users who apply the resin to a chip almost immediately after it happens report the most success. This prevents dirt and moisture from getting into the break, which can interfere with the repair. It’s also important to know what not to do. While you might see "hacks" online suggesting superglue or clear nail polish as a temporary fix, these can actually make it harder for a professional to stop a windshield crack from spreading later on. Ultimately, a DIY kit is a temporary patch, not a permanent solution for significant damage.
Common DIY Mistakes to Avoid
Even with the best kit on the market, a DIY windshield repair is only as good as its application. It’s easy to make a small mistake that compromises the entire fix, turning a simple chip into a bigger problem. If you decide to try a DIY repair, be sure to sidestep these common errors. When in doubt, remember that a professional auto glass service has the tools and experience to get it right the first time.
Skipping the Prep Work
Rushing into the repair without properly cleaning the damaged area is a recipe for failure. Before you apply any resin, you need to remove every bit of loose glass and debris from the chip or crack. Use a pin or the small probe included in your kit to gently clear out the impact point. If you trap dirt or glass fragments under the resin, you’ll create a weak bond that won’t hold. A clean, dry surface is essential for the adhesive to fully penetrate the crack and create a strong, lasting seal.
Applying the Resin Incorrectly
The magic of a DIY kit is the resin, which is designed to fill the air pockets in the crack and bond the glass back together. However, applying it incorrectly can introduce new air bubbles, which defeats the whole purpose. It’s important to follow the kit’s instructions precisely to ensure the resin flows smoothly into every part of the damage. If air gets trapped, the repaired spot will be weaker and more visible. A proper application makes the area structurally sound, but a poor one is just a temporary cosmetic fix.
Ignoring Weather Conditions
Where you do the repair matters just as much as how you do it. Applying resin in direct sunlight or to a hot windshield is a major mistake. The heat can cause the resin to cure too quickly, before it has a chance to seep into the entire length of the crack. For the best results, always work in the shade and make sure the glass is cool to the touch. This gives the resin enough time to settle completely, creating a solid bond that will actually hold. If you can’t find a shady spot, wait for a cooler part of the day.
Using Superglue or Nail Polish (Don't Do It!)
When you’re in a pinch, you might be tempted by internet "hacks" suggesting superglue or clear nail polish as a quick fix. Please don't do this. While these substances might temporarily cover the crack, they are not designed to bond with glass under pressure and temperature changes. Worse, they can contaminate the damage and make a future professional repair impossible. A technician can’t remove these materials effectively, which means a simple chip repair could turn into a mandatory full windshield replacement. Stick to products made specifically for auto glass.
Can a DIY Kit Stop a Crack from Spreading?
When you spot a new chip or crack on your windshield, your first thought is probably how to stop it from getting worse. That’s where DIY windshield repair kits come in. These kits typically use a UV-activated resin to fill in small blemishes like chips, star breaks, or tiny cracks. For damage smaller than a quarter, a DIY kit can be an effective and affordable way to prevent a windshield crack from spreading and keep your view clear. The resin hardens in the crack, bonding the glass together and restoring some of its structural integrity.
However, it’s important to see these kits for what they are: a specific tool for a specific job. They work best on fresh, clean damage that hasn’t had time to collect dirt and debris. While they can be a great immediate solution for a minor rock chip, they aren’t designed to handle larger, more complex cracks. Think of a DIY kit as a solid first-aid measure. It can stabilize the situation, but it might not be the final cure. For a fix that’s guaranteed to last, a professional assessment is always your best bet. Our auto glass services can determine if a simple repair will do the trick or if a replacement is the safer option.
Temporary Fix vs. Permanent Solution
It’s tempting to look for a quick fix when you see a crack, and you might have heard of using superglue or clear nail polish in a pinch. While these might seem like clever hacks, they often do more harm than good. These substances can make it difficult, or even impossible, for a professional technician to perform a proper repair later on. They don’t bond with the glass correctly and can trap dirt inside the crack.
A DIY resin kit is a step above these household remedies, but it’s still often a temporary solution. The best and safest way to stop a windshield crack from spreading for good is to have it professionally repaired. A trained technician uses specialized tools and industry-grade resin to ensure the damage is completely filled and sealed, restoring the windshield's strength and clarity.
How Weather Affects Your Repair
Your windshield is more sensitive to weather than you might think, especially when it’s damaged. Glass naturally expands in the heat and contracts in the cold. These subtle movements put stress on the glass, which can easily cause a small chip or crack to lengthen overnight. Parking in direct sunlight on a hot Kansas City day can heat your windshield rapidly, forcing the crack to expand. Likewise, a sudden cold snap or using your defroster on high can have the same effect.
To protect your windshield, try to avoid extreme temperatures as much as possible. Park in a garage or shaded area whenever you can. If you have to park in the sun, use a sunshade to keep the interior and the glass from overheating.
Signs Your Crack Is Still Growing
Even after using a DIY kit, you should keep a close eye on the damaged area. If you notice the crack starting to extend beyond the filled-in spot, the repair hasn’t fully stopped its progress. A crack that continues to spread is a clear sign that the damage is more severe than the kit could handle. If a crack grows too large, a simple repair is no longer an option, and you’ll be looking at a full windshield replacement.
A good rule of thumb is the dollar bill test. If a crack is longer than a dollar bill, the windshield’s integrity is likely compromised, and it needs to be replaced for your safety. If you see any signs of spreading, it’s time to contact us for a professional evaluation.
Where to Buy a Windshield Repair Kit
Once you've decided to try a DIY fix for that tiny chip, your next question is probably where to get a kit. The good news is they are widely available, so you have a few convenient options to choose from depending on how quickly you need to get the job done. Whether you prefer to shop from your couch or see the product in person, you can easily find a kit that fits your needs and budget.
Shopping Online
For sheer variety, it’s hard to beat online retailers. Websites like Amazon offer a huge selection of windshield repair kits at different price points. You can easily compare reviews, watch video tutorials, and find kits that include all the essential tools, like suction cups for stability and precision applicators for the resin. This is a great route if you’re not in a huge rush and want to do some thorough research before buying. Plus, having it delivered right to your door is always a nice perk.
Checking Local Auto Parts Stores
If you want to get started on your repair today, your local auto parts store is the way to go. Places like O'Reilly Auto Parts or AutoZone almost always have repair kits in stock. The big advantage here is that you can see the product in person and even ask an employee for their recommendation. These kits are designed for the average car owner, so they typically come with everything you need for a straightforward application, including the specialized tools to apply the repair liquid correctly. It’s a solid choice when time is of the essence.
Finding Deals and Discounts
Everyone loves a good deal, and you can often find one on windshield repair kits if you know where to look. When shopping, keep an eye out for promotions or digital coupons that can save you a few dollars. Some online sellers offer discounts for buying more than one kit at a time, which can be handy if you have multiple vehicles. While saving money is great, remember to balance cost with quality. A cheap, low-quality kit might not give you the lasting results you’re hoping for, so always check reviews before making your final decision based on price alone.
Related Articles
- DIY Windshield Chip Repair: A Complete Guide
- Why a Small Windshield Chip Spreads & How to Stop It
- Back Windshield Replacement: What Will It Cost You?
Frequently Asked Questions
What kind of crack can I realistically fix with a DIY kit? These kits work best on very small, simple damage. Think of a fresh rock chip that's round (a bullseye) or has a small star shape, as long as the entire blemish is smaller than a quarter. They are designed to stop this minor damage from spreading. If you're dealing with a crack that's longer than a few inches, has reached the edge of the windshield, or is directly in your line of sight, a DIY kit is not the right tool for the job.
Will the repair make the crack totally invisible? It's best to set realistic expectations. A successful DIY repair will make the damage much less noticeable and should restore the strength of the glass in that small area. However, it rarely makes the blemish disappear completely. You may still see a faint outline or a slight distortion where the chip used to be. The main goal of a DIY kit is to prevent the crack from spreading, with the cosmetic improvement being a secondary benefit.
I used a kit, but the crack is getting bigger. What went wrong? This is a common issue and it usually means the damage was too severe for the kit to handle, or the resin didn't fully penetrate and bond with the glass. This can happen if air bubbles got trapped during the application, if the crack wasn't perfectly clean, or if the damage was already under too much stress. Once a crack starts spreading again after a DIY attempt, it's a clear sign that you need a professional evaluation to prevent it from requiring a full replacement.
Is it really cheaper to use a kit if my insurance might cover a professional repair? While a $20 kit seems like the cheapest option, it might not be. Many comprehensive auto insurance policies cover the full cost of a professional windshield repair with no deductible, meaning it could cost you nothing out of pocket. A professional repair also comes with a guarantee, like a lifetime workmanship warranty, which a DIY kit doesn't offer. It's always worth checking your policy or calling for a free quote before you decide.
I've heard you can use superglue as a quick fix. Is that a good idea? Please don't do this. Using household adhesives like superglue or clear nail polish on your windshield is a bad idea. These materials are not designed to bond with glass and can't withstand temperature changes or road vibrations. More importantly, they contaminate the crack, making it impossible for a professional to perform a proper, permanent repair later on. This can turn a simple, repairable chip into a problem that requires a full windshield replacement.